Data Imports General Information
Find here general information about importing data from a source.
Creating an Import Job#
To create an import job:
-
Click on "+" and select "Import Job" or right-click in the File Browser and select "Create new" and select "Import Job". The 'New Import Job' tab appears in the menu bar.
-
Click "Select Connection". The dialog 'Select Connection' opens.
-
Click on the required connection name and confirm with "Select". The connection is displayed.
-
Select the required file type from the drop-down and confirm with "Next". The tab 'Data Details' opens.
-
Fill in the required settings according to your import type/ connection and confirm with "Next". The tab 'Define Fields' opens.
INFO: Find the settings for your selected import type/ connection in the subchapters of this user documentation. -
Mark the required columns and view the raw records below.
INFO: The raw record shows you how your data is viewed by Spectrum before the import. -
If needed, enter placeholder values and confirm with "Apply".
INFO: This section gives you the ability to assign specific values as 'NULL' Values that are added here are not imported into Spectrum. -
Decide how to handle invalid data.
INFO: This section lets you decide how to proceed if a part of the record does not fit with the standard schema during the import. Selecting the option to drop the record removes the entire record from the import job. The option to abort the job stops the import job when an invalid record is detected. -
Decide whether you want partition data and confirm with "Next". The tab 'Schedule' opens.
INFO: You can partition data using date parameters. When this data is loaded into a Workbook, you can choose to run your calculations on all or just a part of your data. -
Decide whether the import shall be triggered manually or on a schedule.
INFO: Selecting 'manually' reruns the import job in order to update or 'on a schedule' runs the import job update at a specified time. -
Select the way data is replaced or appended, and confirm with "Next". The tab 'Save' opens.
INFO: In the Data Retention Policy section choose whether to replace new updated data or to append it to existing data when updating an import job. You also have the option to choose Append with sliding time window to define a range during which the update expires and how many results to keep. -
If needed, enter a job description.
-
Mark the checkbox 'Import now' if the import shall be started immediately after the saving.
-
If needed, enter the email address for several notifications and confirm with "Next". The 'Save Import Job' dialog opens.
INFO: You can also specify notification emails to be sent for any error messages and when a job has completed successfully. Use a comma to separate multiple email addresses. The maximum character count in these fields is 255. -
Select the path the data shall be imported into, enter an import job name and confirm with "Save". The import job configuration is finished.
Type Conversions#
- Integer columns can be imported as date by interpreting the integer value as UNIX timestamp or epoch timestamp.
- Date columns can be converted as integer, the converted columns are shown as an epoch timestamp.
- Strings can be converted to Boolean, where "false", "no", "f", "n" and "0" are converted to false and "true", "yes", "t", "y" and "1" are converted to true.
Adding or Deleting Columns from an Appended Import Job#
The appended import jobs can contain additional or fewer columns than the previously run import job. When the schema is rescanned, Spectrum notices that columns have changed so no data is lost.
However, data can be lost due to append changes in these circumstances:
- If a column name has been renamed then the schema uses the column with the new name and deletes data from the old column name.
- If the data type of a column has been changed
- If a change in the partition schema is made the data resets starting from the new change
Viewing and Editing Job Settings#
Some of these settings can also be accessed through the 'Save Workbook' settings. The 'Save Workbook' settings let you specify when jobs are run, how error handling should be done and specify who gets notified, and lets you specify what data is saved with the Workbook and how much historical data (if any) is saved.
To view and edit the job settings through the Import Data view:
-
Click the "File Browser" tab.
-
Click on "Import Jobs" in the navigation window on the left side of the screen.
-
Highlight the name of the data source you want to view.
-
Click "Open".
-
Click "Next" to view each type of job setting. You can also make changes.
-
The 'Schedule' screen has settings that can also be set through Save Workbook settings.
-
Specify whether to replace or append data and whether to append using a sliding time window. You can then specify when the data should expire and how many results you should keep.
-
Select which groups have view, edit, and run access permissions and specify what access permissions all users have.
-
Click "Save" to save your changes.
INFO: You can also click Rename to rename the import.
To view and edit the job settings through the Workbook view:
-
Click the "File Browser" tab at the top of the page.
-
Click the name of the Workbook you want to view.
-
Click "Open".
Viewing Dropped Records#
If the import job runs with dropped records, the icon on the page listing all import jobs displays an icon "Completed with warnings".
To view dropped records:
-
Double-click the import job name.
-
Click the recent listing ID in the History list.
-
On the Import job run details page, view the Errors list to find out what happened.
INFO: The job details page showing Job History. The details page showing the list of errors. The error log shown when you click an entry in the list of errors. The job run details page showing statistics and the job log file. -
Use the links in the Job log file section to download the log file, download the job trace, or to report an issue to Spectrum. When you click Report an issue, fill out the bug report and provide steps to recreate the error.
Editing an Import Job#
To edit an import job:
-
Click the "File Browser" tab and navigate to your import jobs.
-
Right-click on the required import job and select "Edit".
-
Make your changes and click "Next" to move through the screens.
-
Confirm with "Save".
INFO: Note that after a schema change, saving the import job deletes data from previous job runs and aborts the job currently running. To keep previous data, use "Save Copy As". If just the partitioning has changed, the "Save & Migrate" button simply performs a migration rather than refetching data from the source.
Creating a Copy of an Import Job#
You can create a copy of an import job. Here are some items to note if you copy an import job:
-
Already imported data isn't copied.
-
The metadata and job definition are copied, including the information and settings on the Schedule screen.
-
To avoid unnecessary data volume consumption, Spectrum recommends reviewing the configuration after copying an import job.
To create a copy of an existing import job:
-
Click the "File Browser" tab.
-
Right-click on the required import job and select "Duplicate". The copy is created and named "copy of" plus the name of the original import job.
Running an Import Job#
You can run an import job manually, or schedule it to be automatically run.
To run an import job manually:
-
Click the "File Browser" tab.
-
Right-click on the required import job and select "Run". Depending on the amount of data, this might take some time.
Deleting an Import Job#
Note that this deletes the import job, not the original data. It also deletes the imported data within HDFS to be removed by the Housekeeping service. Deleting an import job can't be undone. If a Workbook is referencing the imported data, the Workbook might not work.
To delete an import job:
-
Click the "File Browser" tab.
-
Right-click on the required import job and select "Delete".
-
Confirm with "Delete". The import job is deleted.
Linking Data to a New Workbook#
You can link data to a new Workbook.
To link data to a new Workbook:
-
Click the "File Browser" tab and select the required Workbook.
-
Double-click the import job name to link into a new Workbook.
-
Click "Link Data in New Workbook". The data is loaded into a new Workbook.
Viewing Import Job Upload Size and Monthly Upload Sizes#
You can view the count of processed bytes for each upload and their total volume counting towards the license term.
To view the processed bytes per single job execution and totals for that job configuration of the import jobs:
-
Click the "File Browser" tab.
-
Click "Import Jobs" from the navigation bar on the left side of the screen. The size of last job run is displayed first and the total for that job configuration is displayed to the right in parentheses. If a new license term starts and the import job is processed again, the count starts with a new total processed data amount.
Identifying Workbooks Affected by an Import Job Schema Change#
Spectrum gives you a notice when editing an import job if a schema change affects a corresponding Workbook.
To view which Workbooks are affected by a schema change from the import data:
-
Complete the import job configuration until reaching the 'Save' section.
-
Review the note box detailing the changes this configuration save has on the previous save and which Workbooks are affected.
-
Check the box to email users of the Workbooks that are affected by the new schema changes.
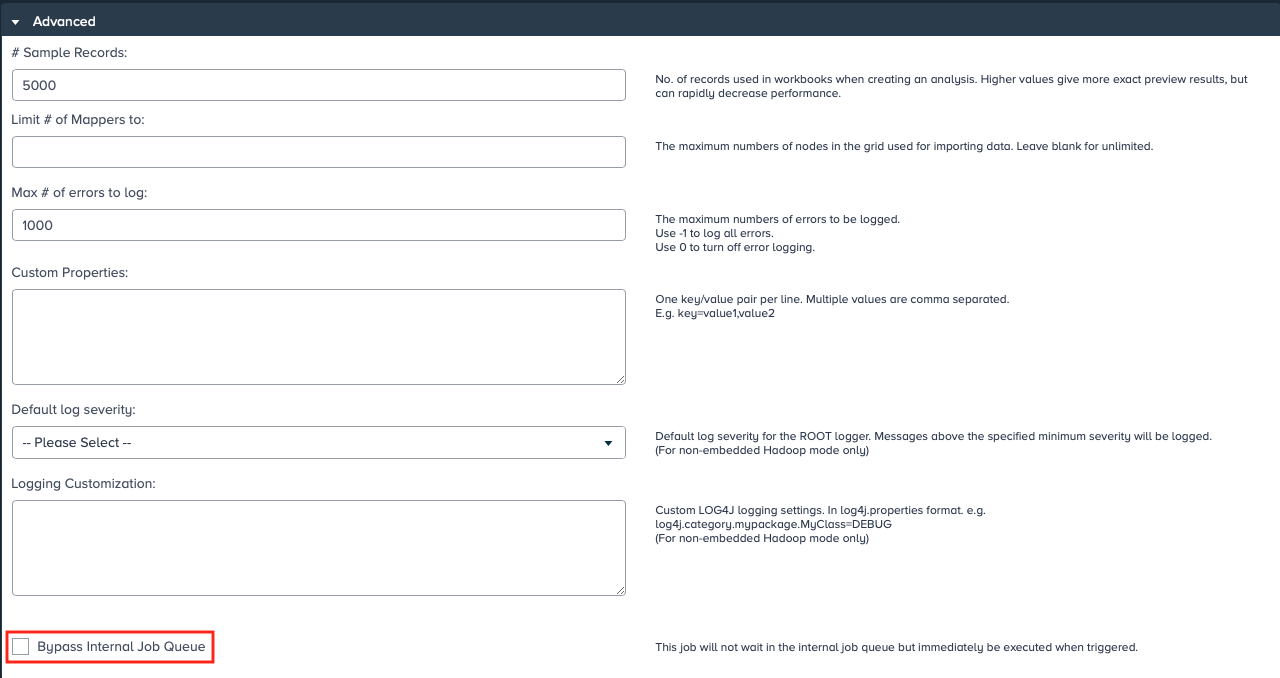
Priorizing an Import Job in the Job Scheduler#
If needed, you can execute priorized import jobs by bypassing the Job Scheduler's queue. For that, according role capabilities are needed as well as cluster resources.
To priorize an import job when configuring it in the import job wizard, simply mark the check box "Bypass Internal Job Queue". The import job will be executed right after finishing the import job wizard.