Data Exports General Information#
Find here all general information about data exports.
INFO
It is also possible to download data from Spectrum without using an export job.
You can create export jobs to export data from Spectrum to other connections such as a database, remote file server, or export results to a third-party BI (business intelligence) software package. Exported data is the result from executing analyses in a Workbook on the original data set. You can initiate a one-time manual export, or you can configure the job to run each time the Workbook is updated or at a specific time interval.
Available File Formats#
Worksheets can be exported to one of the following file formats:
- Apache AVRO
- CSV
- Parquet File Format version 2.1
- Hyper Extract (Tableau as of version 10.5)
- TDE (Tableau Data Extract)
- TDSX (Tableau Packaged Data Source)
Requirements for Exporting Data#
- a Workbook must be created and executed initially
- only saved worksheets can be exported
- exporting data is only available in Spectrum's Enterprise product
- a valid connection must be available, e.g. Tableau Server connection
Configuring an Export Job#
To execute an export job:
- Click the "+" button and choose "Export Job" or right-click in the browser and select "Create New" → "Export Job". The 'New Export Job' tab appears in the menu bar.
- Select the Workbook to export from in the browser by clicking on "Select". The dialog 'Select Workbook' opens.
- Select the Workbook and confirm with "Select". The name of the Workbook appears in the Workbook field.
- Click "Next".
-
Select the worksheet to export from out of the drop-down menu. The 'name of the sheet is displayed in the 'Select Sheet' field. A preview is displayed.
INFO: Only kept sheets are available for export. If the sheet you want to export is missing, modify the Workbook settings to keep the sheet.
-
Click "Next".
-
Select the required connector by clicking on "Select Connection". The dialog 'Select Connection' opens.
INFO: If there is already a valid connection, you'll find it under 'connection'.
INFO: If there is no valid connection yet, you can create it here by clicking on "New Connection". -
Select the required connection and confirm with "Select". The selected connection is displayed in the 'Connection' field.
- Click "Next". The 'Data Details' section opens.
- Enter the information in the 'Data Details' tab, according to the type of file you want to export until the section 'Mapping opens'.
-
Check the preview and decide which columns will be included and whether invalid data is being accepted.
INFO: All checkboxes are activated per default.
-
Decide how to handle invalid data.
-
If needed, decide of time-based partitions and click "Next". The section 'Schedule' is shown.
INFO: This chapter only appears, when having partitioned data.
-
Select the schedule method for when to run the export job.
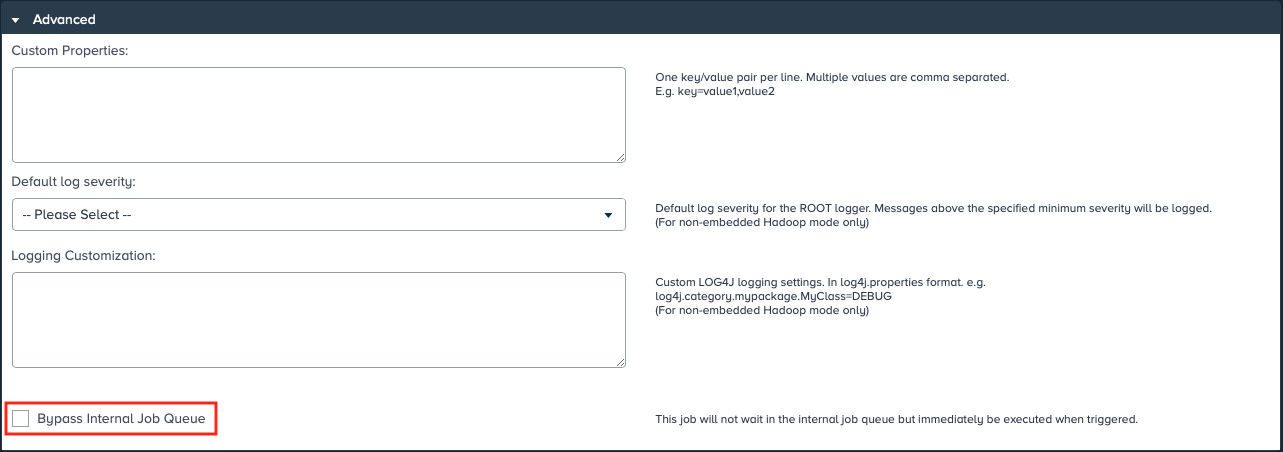
- If needed, add an advanced information, e.g. custom properties and confirm with "Next".
- If needed, add an export job description and mark the check box if you want to have the export job processed right after saving.
-
If needed, add your email address in section 'Notification' and confirm with "Save". The dialog 'Save Export Job' opens.
INFO: Spectrum can only send email notifications if an email server has been configured.
-
Select the place to save the export job, name it and confirm with "Save". Exporting data is finished.
Data Details' Section Specific Information#
INFO
Find here specific information for the 'Data Details' section. The amount and selection of the single sections varies depending on the export type.
When exporting tables to a database, the following data details may have to be defined:
- 'Database' - select the name of the database, the export shall be executed to
- 'Table' - select between 'Use existing' and 'Create new if not exist
- 'Name':
- name of the newly created table in the database if there is no existing table
- if a table with the same name already exists, it will be reused
- 'Table Output Format':
- select from the available output formats
- the new table will be created with the selected file format; if the table exists, the file format will be ignored
- 'Record Replacement Policy' - select between 'Drop and create new table', 'Overwrite records' and 'Append records'
- 'Advanced':
- Setting the 'Maximum number of concurrent data base connections' gives control of database parallelism. The export job can't launch more than the set number of parallel tasks. Each task opens one database connection.
- Setting the 'Maximum records per transaction' exports approximately this number of records within a single database transaction.
-
Setting the 'Rows per batch' establishs a limit for the number of rows inserted for each transaction within a task.
INFO: Tuning this value can influence speed and avoid potential timeouts. Very large batches can overwhelm some databases and limiting the number of rows returned at a time can reduce strain.
Record Replacement Policy#
Use existing
If the 'Use existing' option is selected Spectrum doesn't create a primary key column with name "ID". (i.e., The Workbook must be aware of the ID column. All columns from the destination table (can't be null) must be mapped to a column of the Workbook.)
- 'Append Mode': the records append to the existing table
- 'Overwrite Mode': all records from the existing table are deleted while new records are written to the destination table
TIP
Always select 'Use existing' for tables created outside of Spectrum e.g., Netezza, and never select 'Use existing' for tables created via Spectrum.
Create new if not exist
If the 'Create new if not exist' option is selected Spectrum creates an additional column with name "ID" (primary key). When the database supports auto increment, the database computes the value of this column.
Example: Netezza doesn't support auto increment. In this case Spectrum uses a sequence database object to generate the ID. Specific for Netezza: the name of the sequence used is
- 'Append Mode': the table is created if it doesn't already exists, otherwise the existing table is re-used without changing any schema; the records are appended to the existing table
- 'Overwrite Mode': any previous tmp table is first dropped; a tmp table is created; the records are written to the tmp table; the entire destination table is dropped if one exists; the tmp table is renamed to the destination table; the tmp table is dropped
TIP
Always select 'Create new if not exists' for tables created via Spectrum and never select 'Create new if not exists' for tables created outside of Spectrum e.g. Netezza
Common problems
- Export a Workbook into a table via 'Create new if not exists'.
- A new table is created with an additional primary key column with name "ID".
- Export a second Workbook with Use existing into the same table.
- This fails because the ID is not filled. (See description above)
Exporting Through a JDBC Connection#
Variables that have been created in the 'Admin' tab are available in the drop-down 'Schema' in the section 'Data Details'. The values are validated when saving the export job. When an export job is triggered and the value is evaluated to a not existing table, the export job results in an error. All used variables are listed on the 'Export Job Details' page.
Exporting with SFTP#
An additional requirement for exporting with SFTP is that the user creating the export job must have permissions to create a folder 'mkdir' on the SFTP server. This permission is required even when the folder on the SFTP server already exists.
Exporting Tables to a Database#
INFO
Create or adjust an export job according to 'Configuring an Export Job' and note the following:
- requirement: When exporting to a database, the database connector is associated with a user name. The database user must have write/ or create permissions on the database itself
- when exporting to DB2, the number of characters contained in string data fields is limited to 2,000. When exporting with a larger number of characters, the records are dropped
- when exporting to Oracle, the number of characters contained in string data fields is limited to 4,000. When exporting with a larger number of characters, the records are dropped.
Exporting compressed CSV Files#
INFO
Create or adjust an export job according to 'Configuring an Export Job' and note the following:
- in section 'Connection', select "CSV" from the drop-down as the file type
-
in section 'Schedule' open the 'Advanced Settings' section and enter the property 'das.export.compression.csv=org.apache.hadoop.io.compress.
Codec' INFO: Find the information on <codec> values for Gzip, Snappy, etc. on 'Using Compression with Hadoop and Spectrum'.
Viewing Export Job Details#
INFO
The 'Export Job Details' pages provides information about export jobs:
- the current job status
- configuration details, e.g. the export job name, owner, filename, creation date, ...
- statistics
- history
To view export job details:
- Right-click the export job and select "Show Details" or highlight the export job and select "File" → "Show Details" in the menu bar. The details page opens in the export job tab.
INFO: To leave the details page click on "Back".
INFO: To configure the export job click on "Configure".
INFO: To run the export job click on "Run".
INFO: To show the export job in the File Browser click on "Show in Browser".
Editing Export Job Settings#
To edit an export job:
-
Right-click the export job and select "Open" or highlight the export job and select "File" → "Open" in the menu bar. The configuration tab opens.
INFO: You can also edit from the 'Export Job Details' page.
-
Edit the export job according to your needs and confirm.
Duplicating an Export Job#
To create a copy of an export job:
- Right-click the export job and select "Duplicate" or highlight the export job and select "Edit" → "Duplicate" in the menu bar. The dialog 'Duplicate: Export Job' opens.
-
Enter the name for the duplicated export job and confirm with "Duplicate". The export job is saved in the same folder, the original export job is saved in.
INFO: If you don't rename the duplicated export job in the dialog, it is named "Copy of <original export job>".
Running an Export Job#
To run an export job:
-
Right-click the export job and select "Run" or highlight the export job and click on the "Run" icon in the icon bar or highlight the export job and select "File" → "Run" in the menu bar. The export job proceeds. Running the export job is finished when the check in the column 'Status' is green.
INFO: The job is not run when the check in the column 'Status' is red.
INFO
Export jobs run as a single task if the source sheet is sorted. The sorted sheet can be generated in parallel in the Workbook, but the export job forces the job to run as a single task. To get around this, create a filter on the primary export sheet restricting it to a specific range and select the option to create this filter in a new sheet. Do this multiple times until all of the data is filtered out into separate sheets. Once done, run export jobs against these newly created sheets.
The default configuration has Hadoop distributing the export job to increase performance. The number of split files depends on the amount of data in the export. Each of the split files is exported with an attached sequence number starting with '_00000'. It is possible to configure the export to go to a single file but isn't recommended unless necessary as it may cause performance slowdowns with larger files.
Deleting an Export Job#
To delete an export job:
- Right-click the export job and select "Delete" or highlight the export job and select "Edit" → "Delete" in the menu bar. The dialog 'Delete Export Job:<export job name>' opens.
- Confirm with "Delete". The export job is deleted.
Priorizing an Export Job in the Job Scheduler#
If needed, you can execute priorized export jobs by bypassing the Job Scheduler's queue. For that, according role capabilities are needed as well as cluster resources.
To priorize an export job when configuring it in the export job wizard, simply mark the check box "Bypass Internal Job Queue". The export job will be executed right after finishing the import job wizard.